
Ultimate Car Rental System – PHP MySQL Project | Fast & Secure Rentals
The Car Rental System is a web-based application built using PHP and MySQL. It provides an interactive platform for customers and employees to manage car rentals efficiently. This Car Rental System project is ideal for IT students looking for hands-on experience in web development. Customer Panel: Employee Panel: Technologies Used How to Set Up and Run the Car Rental System Project Using XAMPP: Using Laragon: This Car Rental System is...
Product Preview
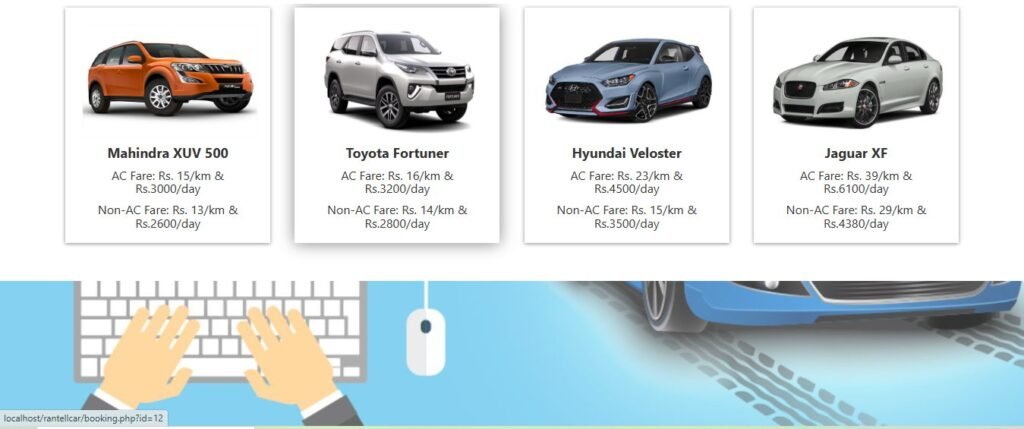
4 images


Detailed Description
The Car Rental System is a web-based application built using PHP and MySQL. It provides an interactive platform for customers and employees to manage car rentals efficiently. This Car Rental System project is ideal for IT students looking for hands-on experience in web development.

Customer Panel:
- Register/Login: Customers can create an account or log in.
- View Available Cars: Only available cars are displayed.
- Rent Cars: Select cars based on rental duration and conditions.
- View Rental History: Track previous rentals and transactions.
- Return Cars: Customers must return cars within the system.
- Invoice Generation: Automatic invoice calculation based on rental duration and kilometers driven.
Employee Panel:
- Manage Bookings: View all customer bookings.
- Manage Cars: Add cars with details such as model, number plate, rental price, and availability.
- Manage Drivers: Store driver information (license number, contact details, gender, etc.).
- View System Data: Access overall rental records, customer transactions, and driver information.
- Apply Extra Charges: Add late return penalties and other fees.
Technologies Used
- Backend: PHP (Version 5.6.3 – 7.4.12 recommended)
- Database: MySQL
- Frontend: HTML, CSS, Bootstrap
- Server: XAMPP / Laragon (for local development)
How to Set Up and Run the Car Rental System Project
Using XAMPP:
- Download & Extract the Car Rental System Project:
- After downloading, extract the project folder.
- Move Project to XAMPP Directory:
- Copy the extracted folder to
C:\xampp\htdocs\.
- Copy the extracted folder to
- Start Apache & MySQL in XAMPP:
- Open XAMPP Control Panel and start
ApacheandMySQL.
- Open XAMPP Control Panel and start
- Create the Database:
- Open a browser and go to
http://localhost/phpmyadmin. - Create a database using the name provided in
01 LOGIN DETAILS & PROJECT INFO.txt. - Click on the Import tab and select the
.sqlfile from theDATABASE FILEfolder.
- Open a browser and go to
- Run the Car Rental System Project:
- Open a browser and visit
http://localhost/[PROJECT_FOLDER_NAME]. - Use the provided login credentials to access the system.
- Open a browser and visit
Using Laragon:
- Download & Install Laragon:
- Download Laragon from Laragon Official Website.
- Install and start
ApacheandMySQL.
- Move Car Rental System Project to Laragon Directory:
- Copy the project folder to
C:\laragon\www\.
- Copy the project folder to
- Create the Database:
- Open
Laragonand click onDatabaseto accessphpMyAdmin. - Create a database as per the details in
01 LOGIN DETAILS & PROJECT INFO.txt. - Import the
.sqlfile from theDATABASE FILEfolder.
- Open
- Run the Car Rental System Project:
- Open a browser and visit
http://[PROJECT_FOLDER_NAME].test(if using Pretty URLs) orhttp://localhost/[PROJECT_FOLDER_NAME]. - Log in using the provided credentials.
- Open a browser and visit
- If you face issues due to PHP version incompatibility, downgrade to PHP 7.4.12 or lower.
- Recommended browsers: Google Chrome, Mozilla Firefox.
- For any missing dependencies, ensure you have the correct PHP extensions enabled in
php.ini.
This Car Rental System is an excellent project for beginners and intermediate developers looking to enhance their skills in PHP and MySQL. Enjoy coding and exploring this Car Rental System project!
Key Features
Fully Responsive
Works perfectly on all devices and screen sizes
Cross-Browser
Compatible with all modern browsers
Clean Code
Well-documented and easy to customize
Fast Loading
Optimized for speed and performance
Customizable
Easy to modify colors, fonts, and layouts
Great Support
Dedicated support team ready to help
Installation Guide
Download the Product
Click the download button to get the ZIP file. Extract it to a folder on your computer.
Upload to WordPress
Go to your WordPress admin panel → Appearance → Themes → Add New → Upload Theme
Activate & Configure
Click activate and configure the settings according to your needs in the Customizer.
Start Using
Your product is now ready! Start creating amazing content with your new tool.
Version History
- NEW Added dark mode support
- IMPROVED Performance optimization
- FIXED Mobile navigation issues
- NEW Added custom widgets
- IMPROVED Better documentation


